Tuesday, February 2, 2016

Developing skills through games: iTrax

A lot of times parents ask me what kind of toys I recommend for their children. Of course it depends of the age of the child, of his/her current skills and the skills that we want to develop further. I decided to make small posts of some of the toys that I use in therapy with ideas of how to use them for developing certain skills. One of the first games I ordered when I started to work as a pediatric occupational therapist on August 2014 was the iTrax Game. I really hadn't seen it before; I just did a search on educational toys and decided to try it.


What's the game about?

This game includes 25 double-sided pattern cards or "mazes" like I like to call them. They come in 3 levels of difficulty:


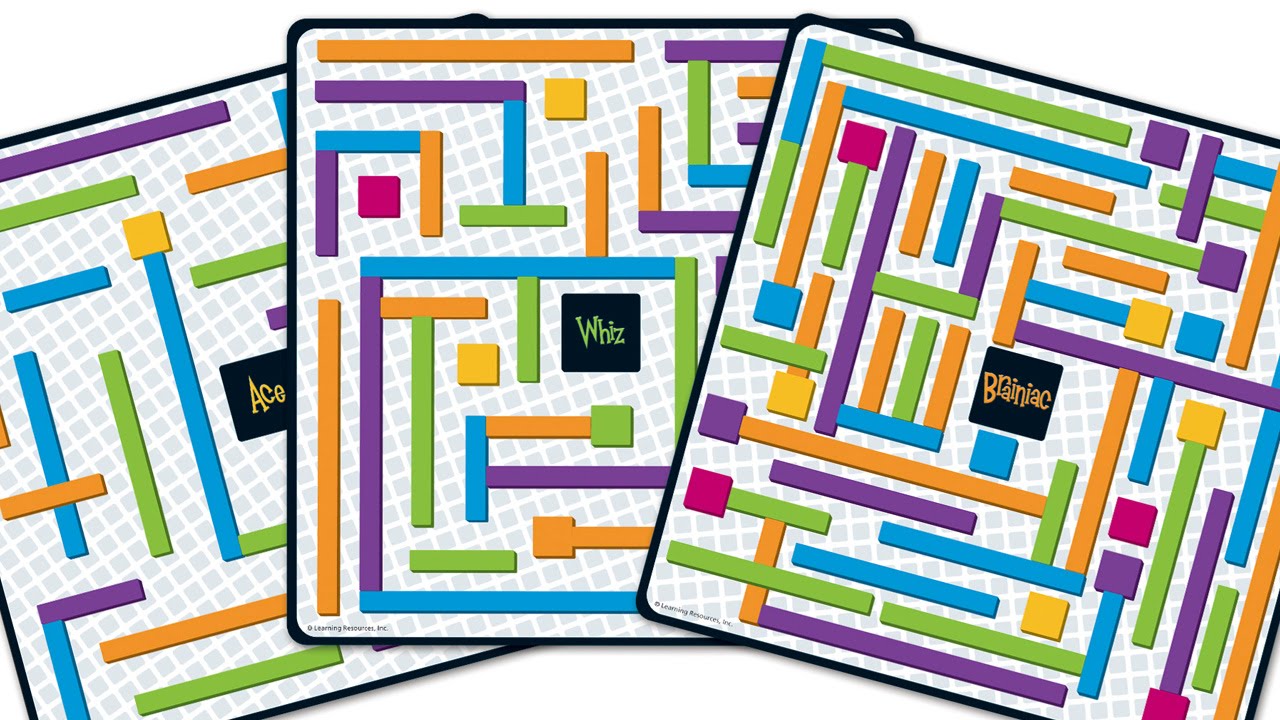
 The objective of the game is to be the first person to find the path that connects two cubes on the card without any blank spaces between them and to replicate the path using the included multicolored sticks and cubes. 
The first one to complete the correct pattern wins. 


Skills that helps develop:

Figure Ground- finding the squares inside the cardboard (especially in brainiac level) requires to discriminate between the figure you are looking for (square) and the rest of the background (sticks). Finding the correct path hidden between many fake paths also works on this skill. Figure-ground discrimination is helpful in finding the right notebook or pencil inside a school bag. It's also used when you need to find a specific word inside a paragraph or text. 

Visual Tracking- Once you find a square, you need to visually track the whole stick pattern to see if it gets you to another square without any blank spaces in between. Some kids have difficulty with smooth eye movements and they skip words or letters when reading or copying. 

Visual discrimination- The hardest part of this game for my OT kids has been discriminating the correct size of the sticks without measuring it against the cardboard. Some even have difficulty choosing the right colors (a con of this game is that some of the colors in the cardboard don't match exactly to the colors on the sticks and cubes). Visual discrimination is important in differentiating between similar geometrical shapes (such as differentiating between a square and a rectangle), letters and words. 

Spatial Relations- When replicating the maze, kids have to put the pieces in the correct angles and position. This skill is evidently used in math classes, but is also needed for simpler things such as following directions and avoiding letter reversals (ex. b and d). 


Adaptations:

The game is intended for kids 6 years old and up. For younger kids or children with severe visual perceptual difficulties, I make them match the pieces to the cardboard. It's easier and stills works on the wanted skills. You can ask them which size they think will match the picture before they try to put in on to make it more challenging.


This game is intended to be played by 2-4 players. Since I usually give therapy sessions one to one, is not as fun for the kids. It's one of those activities that they complete, but don't ask for it the next time. When I've had the opportunity to take kids in small groups, they seem to enjoy the game a lot more. 

If you are giving therapy one to one, another option for making the game more interesting is to time the kids and challenge them to complete the next one in less time.

*Bonus tip- If you want to work deeper into visual-motor skills you can make the children draw the maze with crayons in a paper after building it.

Have you used this game in therapy or at home before? Do you have any other ways of using it? Let me know in the comment session.

Note: I am not being paid for posting about this product. I bought this item at full price just like anyone else. This is my honest opinion about the item.
 

Monday, August 31, 2015

How to make your own weighted blanket (or not).

After taking my first two Sensory Integration Certification courses, I decided that I wanted to own a weighted blanket. They provide deep tactile input which has been shown to help auto-regulate the sensory systems, specially the tactile system. I made a quick search and found out that a 10 pound blanket ranged from $70-$100+, so I decided to make my own. After reading how “easy” it was to make and how you can do it all in just one day, I got the materials for about $40 and started the project.

 I ordered 10 pounds of weighted plastic beads on ebay for less than $30. 

 The beads looked something like this:


After that, I made a sack of the size I wanted my blanket to be. I made this a while ago and I don’t remember de actual measurements, I ended up making my blanket smaller than planned because it was taking too long and I wanted to finish already. 

This is how the original sack looked:


This bed is a little smaller than Full size. For making the sack I just folded the fabric and sew in the bottom and left side. 

Next you have to do some math. You have to decide the size of the squares you want in your blanket and calculate how many squares you need to cover the whole area. The bigger the squares the easier it would be to fill them with beads and to close them without the beads falling or spreading and making your machine needle crack when accidentally touching a bead (happened to me many many times). After you do your math, you have to sew all the vertical lines in the fabric like this (or maybe straighter).


I am not an avid sewer, and it was extremely difficult for me to make the lines straight. If you have sewing skills similar to mine, I recommend buying a fabric that already has a square design, or be more patient, measure carefully and draw the whole lines with a pencil before sewing. 

Next some more math! Depending on the amount of squares and beads, you have to calculate the amount of beads you have to put in each square to be able to have the desired weight on the blanket. The weight recommended per person is the 10% of their weight plus one. So if you are making a blanket for a kid that weighs 60 pounds, you will want to make a 7 pound blanket. 

I used an old gift wrap paper tube and a funnel to put the beads through the vertical lines that I had sewn:


After you finish each section, it's time to sew the first horizontal line. Before I started sewing I marked the corners to know where I should start for each horizontal line.


This was the hardest part for me. My squares where too full of beads and when I put them horizontally they spread all over the place, causing many broken needles. Also, it was very hard for me to maintain a straight line while sewing. Another problem here is that when you have many rows done, it becomes very uncomfortable to manage because of the added weight. 

I did this process 10 more times (It did NOT take me a day, more like weeks!). That's when I got tired, stopped the process and closed the blanket before I got to make all the squares that I had originally calculated. Be sure to left at the end enough space to bend your end and sew it nicely. 

So here is my final blanket:


It measures roughly 35 by 42 inches. Each square was supposed to measure about 4 by 4 inches, but you know, I decided to be creative in that aspect. It weights about 7 pounds. 

Even though other bloggers made it look so easy to make this blanket, it was very difficult for me. Besides the problem with the broken needles I also had a problem with spilled beads all over my floor and difficulties with measurements. It made me wish I had just spent the extra money and buy a commercial one. But, I wouldn't have this great post to share with you, so #NoRegrets. 


Have you done a weighted blanket before? Share any tips or experiences in the comment section!

Thursday, August 13, 2015

SIPT training

Hello!

I know it has been a while since my last post. I have been reading a lot about things not directly related to OT and I guess I lost inspiration for the blog for a while. I have recently been learning about overall health from a functional medicine perspective. I came across with the topic after looking for information online about how to control Hashimoto's hypothyroidism naturally. I found the things I was reading very interesting and have gotten kind of obsessed with that. 

In other news, a couple of weeks ago I took another of the Sensory Integration Certification Program courses. Recently I remembered that I never talked about taking these courses on the blog. 

SIPT Test Kit

As you may already know, the Sensory Integration Certification Program consists of 4 courses (each one lasts 5 days). I started with the certification courses right after graduation on July 2014. After that, I took the 4th course in December 2014, and the 2nd course this July. This is the first time that this certification is being offered in Puerto Rico. 

I recommend every OT that works with children to take at least the first and last course (you can only take those two, but you will not be awarded a certification in sensory integration). The 2nd and 3rd course are about the SIPT which stands for "Sensory Integrarion and Praxis Test" by Jean Ayres. 

By my island's standards this test is extremely expensive. They told us in the course that OTs in the United States charge from $600-$1,500  for each evaluation that includes the SIPT. I understand the cost because only the test kit goes over a $1,000 and it takes a lot of time to learn, administer and interpret. Besides that, you have to pay for the four courses of the certification (about $750 each) in order to be able to administer it. As if that's not enough, you also have to pay about $300 for each 10 administrations to be able to calculate the results (which I find unfair). Also the shipping cost of the kit to Puerto Rico was almost $300 because they count it as "international shipping" and use UPS to send it here. 


The problem with this is that where I live, we usually charge for a standard OT evaluation between $120-$250.  Even though in Puerto Rico we use the same US dollar, and food and services are priced the same or higher than in the US, our salaries are much lower.  I'm not sure parents will be able to pay the real value of an evaluation that includes the SIPT. 


I decided to take the whole course even though I may never have an actual SIPT client to have the credentials and knowledge to be a better OT. For now, I need to practice all 17 subtests and administer the test to 3 typical children and 1 child with suspected sensory integration difficulties. I have to bring the results of the last child to the next course to learn how to interpret them. I'll let you guys know how that goes. 


Thursday, March 5, 2015

Activity Analysis: Sand Art Craft

A new company called Special Needs Essentials asked me to collaborate with them by sharing my opinion of their website and offerings. Recently, they sent me a product so I could write an article for their blog about the importance of Arts and Crafts for child develoment. Below is the post that was featured on their blog:


"When I was a little girl, I used to spend a big part of my free time doing crafts. My grandmother and aunt loved them, so they will always include me and my little sister in their projects. For Christmas, my parents and other family members used to get us all kinds of craft kits. Back then they were just fun activities, but now than I’m an Occupational Therapist, I realize how many important life skills I was learning through those projects.


Crafts help kids develop fine-motor and eye-hand coordination skills as well as tolerance, problem solving and learning to follow instructions. They are also a good opportunity to bond with your child and to work on communication and social skills (such as sharing).  Even though today kids seem more interested in electronic devices, I’ve noticed in my practice that most kids still love arts and crafts. It’s up to us to provide them with opportunities to participate in such activities.


A couple of weeks ago I received this Sand Art craft kit from Special Need Essentials to try it out with my kids. It’s a fun craft that can be adapted to kids with different skills. 


I used this kit with patients from 4-18 years old. It consists of gradually peeling small pieces of paper from a sticky surface and then applying colored sand to fill the space and form the picture.  While doing this activity, we worked on fine-motor skills such as pinch grasp for peeling the papers (a task that was difficult to most of my patients). You can adapt it by starting to peel one corner and letting the kids do the rest.  


 Cutting the tubes (or similar things such as straws) is a great way to introduce scissors skills to little ones. That’s because they are easier to manage than paper and also help to strengthen the small hand muscles.


We also worked on developing a tripod grasp (like the one used in writing) while holding the sand tubes. The following little fella had trouble at first, but with some OT help he did much better.


 Applying the sand in the right place works on eye-hand coordination skills. If you put the sand in a bigger container, it requires more motor coordination to be able to pour it without dumping the whole amount at once.


 The sand also provides an extra sensory input to this activity. It's important that children get the opportunity to play with different textures to help them develop tactile sensory modulation and discrimination. The boy in the picture below doesn’t like the feel of sand or other similar textures, but because the activity is engaging to him, he is able to compromise so he will be able to see the end product.  This is one of the big reasons why crafts are so effective; they provide a great motivation that helps kids work in skills they usually don’t want to.


This activity requires to be done one spot at a time, which is great for working on tolerance and following instructions. It's important that the kids are also responsible for the cleanup, which is an independent living skill.


Below two of the end products:


You can make the activity easier by peeling the paper yourself and letting the child just fill the spaces with sand or by peeling larger amounts of paper at once to decrease the steps and time in finishing the task. Let me know if you have done something similar with your kids. You can also share crafts ideas in the comments below!"

Saturday, February 7, 2015

Sneak Peak

Today I recieved something in the mail! New post coming soon! 


Sunday, January 18, 2015

Needlepoint Monster Bookmark for visual-perceptual and visual-motor skills

When I started working as a school based OT in August, I had many students between 9 to13 years old. I didn't know what to do with them in therapy since they were pretty functional. So I found this cute project in knitsforlife.com and decided to give it a try:


This is my version of the bookmark:


After working with this with my bigger kids for about a month, these were some of the results:


It is incredible how difficult it is for most kids to thread a needle or follow a simple stich pattern. These little monsters requiere visual-perceptual skills such as visual discrimination, spatial relations and visual memory. It also requieres visual-motor coordination and fine motor skills. As you may see, I adapted the activity for some of the kids by having them do longer stiches. With this task you can also work on frustration tolerance,  problem solving (example: when they put the needle in the wrong place, how do they fix it?) and so on. 

If you decide to try it, let me know how it goes!

If you need a more specific tutorial than the one offered in Knits for Life, please let me know in the comment section. 

Sunday, January 11, 2015

Update

After months of thinking about it, I have decided to continue posting here instead of Tumblr for the moment. I'm just taking advantage that this page gets more traffic since the AOTA pinned one of my posts on their pinterest page. I’m also trying to start a blog for parents and professionals in Spanish, since there are very few blogs about Occupational Therapy topics in my native language, and I would love to make a contribution to that. Even though it's easier for me to blog in Spanish, it has been difficult to get readers to my blog. I don't know if it’s cultural, but I just happen to get more comments with the English version, which I love and keeps me motivated to continue writing. This Tuesday I start work again, so wish me a good semester, I'm also supposed to start a new job this month, so I'll try to keep you updated. 


With OT love,


Luna